No one has ever accused me of being the most talented person in the world. In fact, they are absolutely correct to withhold such praise from me and my endeavors. The attribute with which I have garnered the most respect is that of being a craftsman. A craftsman in our trade has an incredible amount of detailed knowledge, a discerning ear, a vast supply of experience, a psychic amount of foresight and microscopic laser focus while maintaining a big picture view of the project and approach.
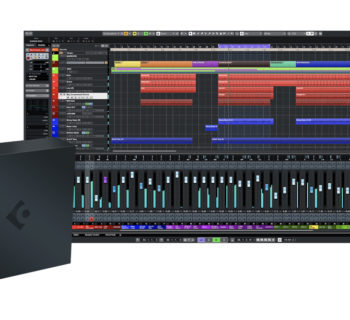
Another part of being an incredible craftsman, regardless of industry, is understanding the tools of the trade. Arguably our most important tool is the digital audio workstation. Synonymous with any tool of any industry, there are a litany of manufacturers, options, features and the like. So how did we arrive at this Golden Age of the DAW and how should we navigate this increasingly complicated environment in order to maximize our recordings and productions?
The digital audio workstation, herein referred to as the DAW, was created many years ago as a stereo audio editor. Apples to apples, this is the equivalent of humans discovering fire. The DAW rapidly evolved to become a recording console inside of a computer, which would equate to our first attempts at harnessing fire in order to cook food.
This timeline can be traced all the way back to 1989, so we are celebrating this piece of technology’s 30th birthday. Screenshots and videos from the version of any DAW five years ago seem a bit comical due to their primitive GUI (Graphical User Interface) and features, so imagine how restrictive and basic the first versions of “Sound Tools” must have been.
For this reason, most DAW’s want to be operated in the same or similar fashion as a console. The tricky part about that is we learn the DAW long before we are ever in front of a desk, so it’s not an easy process of “apply what you know about the console to the DAW”––it’s reverse order.
Rather than wholly focusing on the operation, similarities and differences between a console and a DAW, we will examine a much more modern application: how the multi-DAW environment can be harnessed, practiced, exercised and professionally navigated with efficiency and effectiveness.
There are myriad DAW options available to us today, such as: Ableton Live, Studio One, FL Studio, Cubase Pro, Digital Performer, Nuendo and more. Some musicians, producers and engineers use the DAW with which they find the most comfort, then stick with it through thick and thin, even as some tasks become cumbersome and frustrating. So why don’t the DAW’s get together and decide on a uniform way to approach composition, recording, editing and mixing? Or why isn’t there one “Master DAW” that does all of those things perfectly?
The reason is actually quite clear: none of the DAW’s want to be too much like another (because they are competitors), yet they all want to accomplish the same core processes (composition, recording, editing and mixing).
So here we are: each DAW approaches the aforementioned processes in a different way because none of them want to be too much like another, yet they all must provide solutions for these very common production tasks to be completed. So why are some better than others for certain production tasks that we all must accomplish?
Here is the Dirty Little Secret
All DAW’s are not built to function at a high level across composition, recording, editing and mixing processes.
The companies and manufacturers are hyper-aware of their competition’s approach to these processes. This is why we don’t see a vertical-style workflow, made popular by Ableton Live, being integrated into Pro Tools. On the other hand, we don’t see Ableton incorporating a playlist-based style of comping, which was made popular by Pro Tools.
For this reason, many professional producers and engineers at the top of our industry have adopted a multi-DAW workflow. This is worthy of an in-depth exploration. Our areas of focus will be Logic Pro and Pro Tools, as they are the two most widely accepted DAW’s on the “records” side of the professional community (i.e. not live performance, sync or post-production). The producers who employ these two DAW’s develop and oversee a record from start to finish. This process is not limited to programming drums and making beats, but also includes tasks such as: capturing virtual instrument and sampler performances during composition, tracking and comping vocals and instrumentation, nudging and correcting the timing of a performance, healing errors or hiccups that happened during the recording process, subgrouping, automating, mixing and delivering a final master to a record company or individual client.
Background and Approach
Logic Pro’s initial release was in 1993 as “Notator Logic.” The name given to this software at its inception offers some insight as to what we can expect it to do well. To “notate” is to transcribe music on staff paper, including clefs, notes, rhythms and articulations. The compositional features and workflow in Logic Pro far exceed those of its digital counterpart in Pro Tools. Stock creative tools in Logic Pro include a wide array of synthesizers and playable instruments, samplers, loops, a built-in drummer and a user-friendly piano roll, which is very useful for writing and editing MIDI. Other MIDI editors include a step editor and even a score editor, where you can view the performance of each track on a staff. Logic Pro becomes even more powerful when high-end, third party instruments and samplers are installed and incorporated into the creatively intuitive workflow.
Pro Tools’ initial release was in 1989 under the guise of “Sound Tools” (it became Pro Tools in 1991). Again, the name given to this software at its inception offers some insight as to what we can expect it to do well. Whereas Logic Pro’s features are designed to enhance creative workflow, Pro Tools excels in all technical processes related to record production, including: organizing, tracking, comping, precise editing, processing and mixing. Saving multiple takes on the same track in the form of a playlist and comping them together is seamless. Copying and pasting any amount of information, from one instrument to an entire multi-track a cappella, is shockingly easy. Automating parameters of tracks and plug-ins is fast and efficient. Even sample-level editing is effortless: zoom in and change to the pencil tool.
Aside from being two of the earliest DAW’s in existence, Logic Pro and Pro Tools share other similarities in the broad stroke, big picture areas. Both have similar types of tracks available to create and use (audio, instrument, aux, etc.). Both can be operated in a multi-window fashion. Both host audio and MIDI, have various editing tools, can be operated across several editing modes and share a layout that resembles a recording console.
As previously mentioned, the differences are in their approach to composition, recording, editing and mixing. One shines where the other lacks (and vice versa). The most common way I relate the differences between these two DAW’s is to compare them to hand tools. Any craftsman worth his weight needs to understand his tools, and DAW’s are no different in that way.
Let’s imagine for a moment that you just earned a platinum plaque from the RIAA. Regardless of where you are in your career arc, this is a major accomplishment. Now we need to hang it on the wall in the studio. Well, Logic Pro and Pro Tools are like a hammer and a screwdriver. If you don’t understand your tools, the process might go a little something like this:
You pick up the hammer, but then reach for a screw. You hold the screw to the wall and begin hitting it with the hammer, trying to drive it in. Might it go in far enough to actually hang the plaque and accomplish the task? Maybe. Was it much more difficult, frustrating, unstable and possibly painful if you whacked your thumb a few times? Definitely. For the next plaque, you reach for a nail this time...but then pick up the screw driver and start hitting the nail with the handle. Same experience, right? It might actually get far enough into the wall to hang the plaque, but there was an easier, faster, more efficient way to accomplish the task sitting in the tool box....we just didn’t know how to apply the tools.
Logic Pro is an outstanding application for composition and writing with MIDI, using things such as virtual instruments, samplers and loops. Remember, it was created as “Notator Logic.” Using Logic Pro as our tool for these processes is fast and efficient. Might we be able to get the composition and writing portion of our record done in Pro Tools? Maybe...but it will be clunky along the way and the plaque might hang a little crooked.
Pro Tools (SOUND Tools) far surpasses all other DAW’s for organizing, recording, comping, precision editing, processing and mixing purposes. Its features are centered around these kind of operations and make life easy for those who understand how to apply this powerful tool. Might we be able to cut, copy, paste, comp, nudge, duplicate, stutter, crossfade, rearrange, edit and mix in Logic Pro in a fast and efficient manner? Maybe...but we will have to clean up pieces of the wall that fell to the floor when we were trying to hang the plaque...and it’s probably still crooked.
The first step in avoiding a frustrating experience during production is understanding how these tools should be employed. However, there is much more to consider when examining the multi-DAW workflow. Why do we use certains DAW’s and when should we use them? Let’s get down to details.
Logic Pro
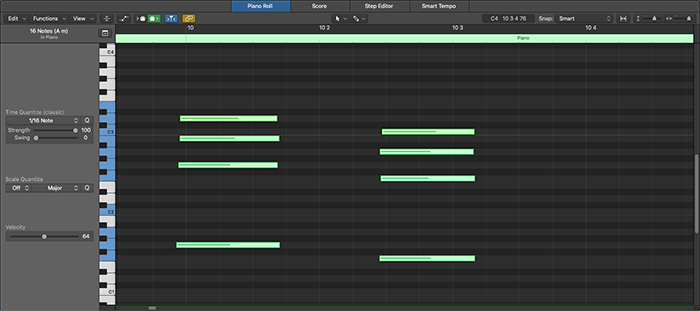
Logic Pro is mostly used in writing, pre-production and composition studios. These spaces are typically smaller in size, don’t have a recording console and may be located in a residence or a facility that houses several small studios that are paid monthly (lockout). As previously mentioned, Logic excels in all tasks related to composition. MIDI information is presented in a clean, flexible fashion in the piano roll.
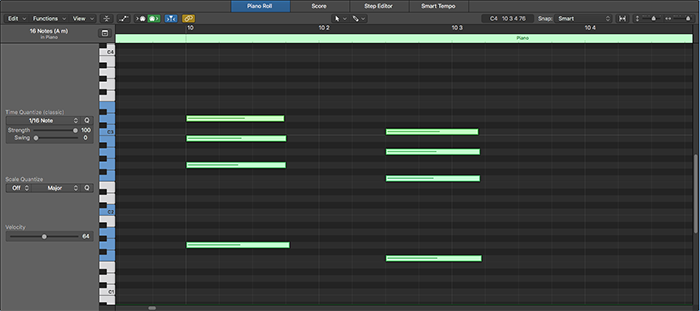
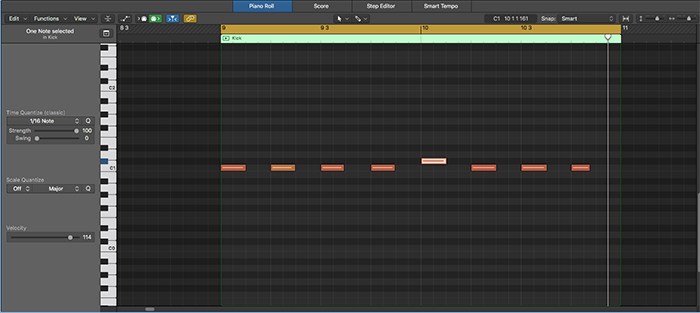
Notice how the MIDI events can be easily quantized according to a specified note division by pressing Command + A to “select all” and then the letter Q to quantize:
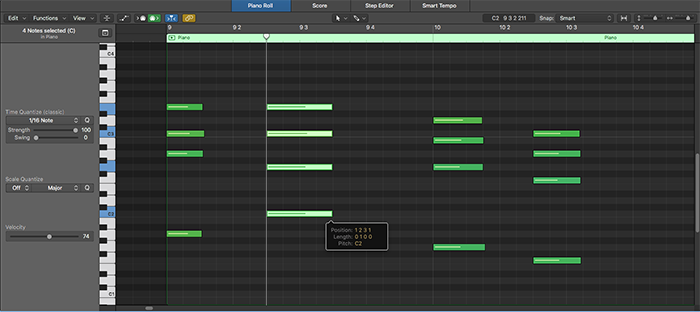
Adjusting the length of multiple notes at once is fast and efficient. It can be done so the notes keep their relative lengths or so they all snap to the same length. Hold shift while dragging a note to make all selected notes snap to the same length:
Adjusting note velocity is easy and flexible as well. There are three options when using the velocity slider in the lower left corner of the piano roll:
1. Adjust the velocity of an individual note.
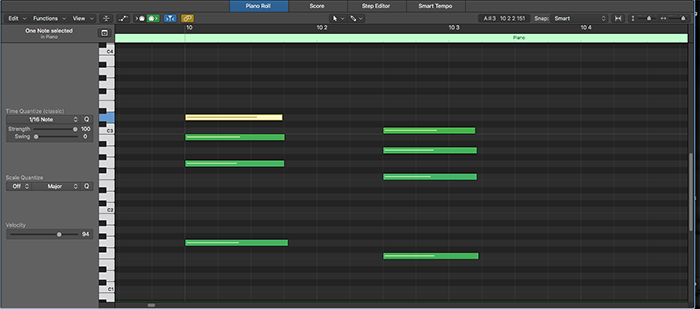
2. Adjust the velocity of multiple notes while retaining their relative velocities.
3. Adjust the velocity of multiple notes while forcing them all to the same velocity by holding the Option key while you adjust the velocity slider.
Changing the pitch of a note to audition different chord voicing or drum sounds is very easy to do, and is particularly powerful to do while playback is rolling. Hold option and use the arrows on the keyboard.
In order to fully understand our tools, we also need to know where they lack. Logic does not handle audio-related processes as well as Pro Tools. Examine a vocal comping task in Logic (using take folders) versus Pro Tools (using playlists). In Pro Tools, it’s much faster to isolate the area of the vocal to be used and move it seamlessly to the comp track or playlist. Logic attempts to keep up with a method called “Quick Swipe Comping,” which actually creates a scenario where the computer is finishing the vocal edits and crossfades for us. Scary. We want full control over our song, especially the lead vocal, and never allow the computer to tell us what to do. In Logic Pro it takes a few extra steps in order to get the vocal takes to the same complete flexibility that can be achieved with Pro Tools immediately.
Logic Pro should be incorporated into the workflow at two points: before the vocal has been recorded (while developing the basic instrumentation and drums for the demo) and after the vocal has been recorded (to add or reinforce melodic and rhythmic themes that occurred during the vocal sessions). Using our composition tool in this way allows us to keep a high level of flexibility and power each and every time we need to add a new drum or piece of instrumentation. In other words, it keeps the composition tasks contained to Logic and allows us to hit the nail with a hammer instead of a screw driver.
Pro Tools
Pro Tools is found in all high-end, professional recording facilities. This is because all DAW roads eventually lead to Pro Tools in the professional environment. However, many project studios and residential spaces rely on Pro Tools for their precision tasks that are audio-related. Pro Tools’ design, multitude of potential workflows, high-level flexibility and precision with regard to the tasks in which it excels is unparalleled. Let’s examine a few examples of the almost effortless processes common in Pro Tools.
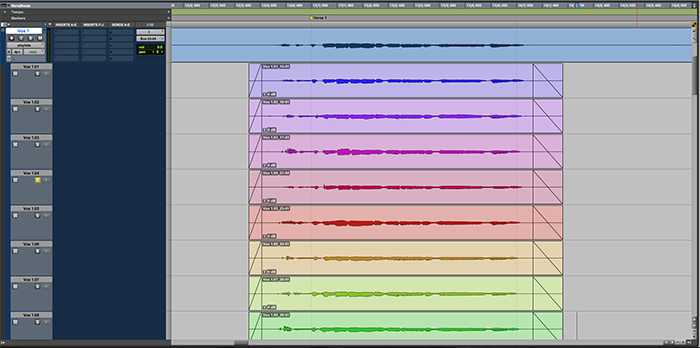
Listening to each take of a vocal performance, via playlists, is a one-button click:
After the best take has been selected, locking it in to a comp playlist is also a one-button click:
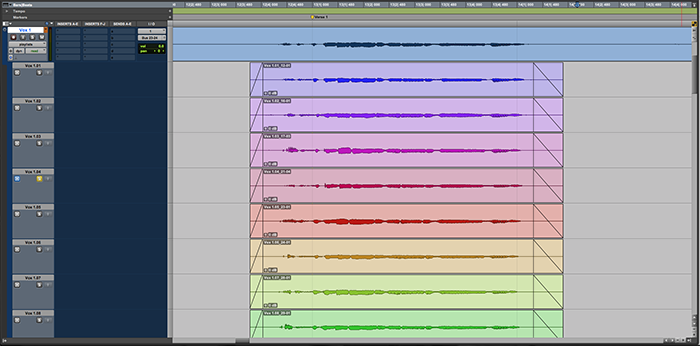
Additionally, if a “comp track” workflow is preferred (which I endorse), holding control and option while dragging the clip to the comp track will guarantee that the vocal maintains the exact timing with which it was performed, while simultaneously creating a copy of the clip (rather than destroying the take)
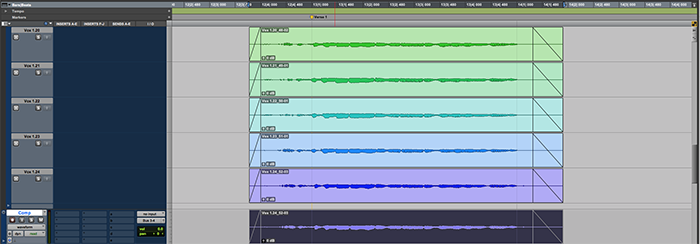
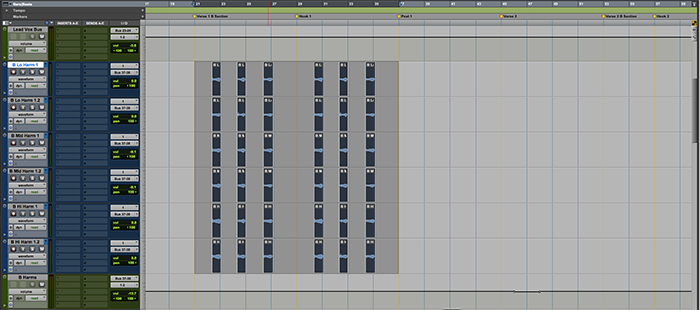
Working with the grid is powerful and easy. In this example, there are three ways to “fly” instrumentation or vocals while guaranteeing the exact timing of the original performance is maintained without having to switch modes or tools. The first example is selecting the appropriate areas of the grid and Command + D to duplicate:

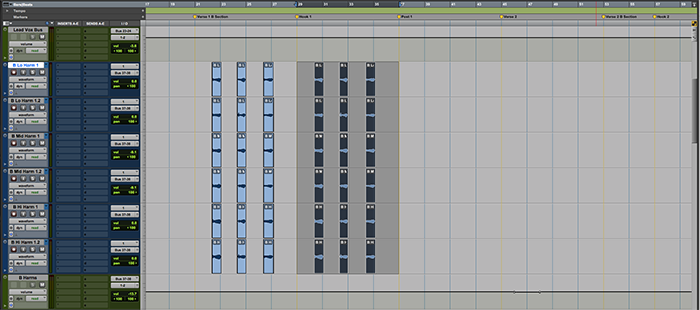
Second, this process can be done by selecting the grid, holding option and dragging the performance to the desired area of the song:
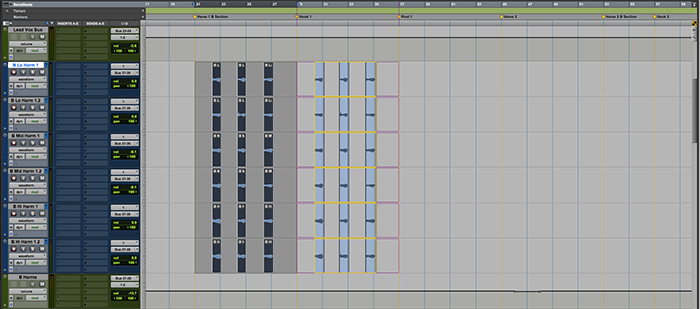
Finally, a clip group can be created and flown to the other desired area(s) of the song by making the selection on the grid, using the keystroke Shift + Option + G, then holding option and dragging it to wherever it needs to land:
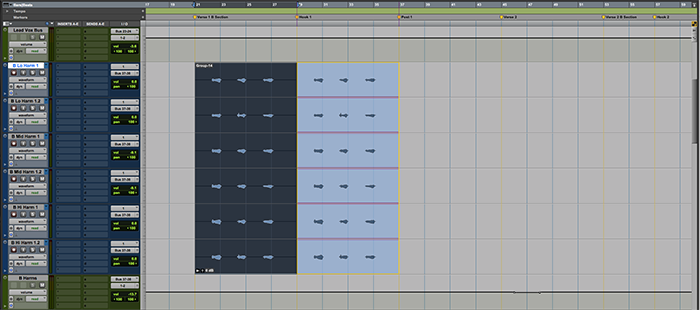
These clip groups can stay as they are, or can be ungrouped with the keystroke Shift + Option + U:
Fades and crossfades could not be easier. In slip mode and with A-Z shortcuts enabled, select the area of the clip or clips to be crossfaded and press the letter F. That’s it. Done.
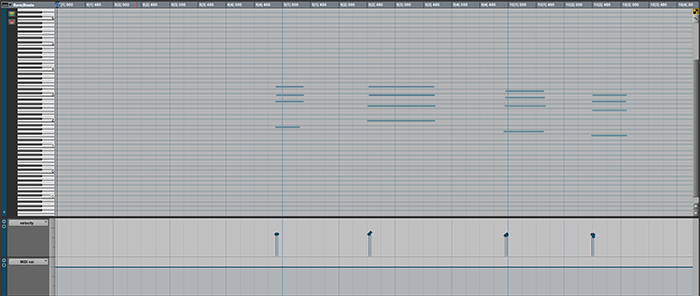
Pro Tools lags behind Logic Pro with respect to the composition and piano roll facets of recording and production, both from visual and functionality aspects.
At first glance, the visual presentation of the piano roll does not appear as intuitive, inviting or streamlined:
Quantizing MIDI in Pro Tools is not integrated into the piano roll and requires multiple windows to be open. The keystroke Option + 0 must be used, which launches the Event Operations window:
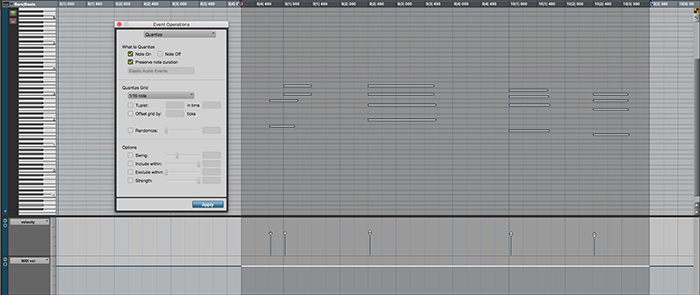
From there, the selected MIDI can be quantized. Even still, the quantize process does not seem to have the same response as Logic Pro, as notes in Pro Tools may end up not fully quantized or not on the grid (like the first chord on the piano track pictured above...that is an actual result).
Pro Tools fits into workflow as the recording DAW and final destination of the creativity. After the editing, comping, tuning and rough mixing is complete (all of which are quite cumbersome in Logic Pro), professional mix engineers expect Pro Tools sessions. Working in Pro Tools prior to the mixing process, even if you are not mixing the song, will help streamline workflow as well. If another DAW is used, an export procedure must be performed to consolidate tracks and audio files at specific sample rates and bit depths. Also, all files must begin at the exact same time and have a healthy signal level. A failure in these processes could increase the chance of an error in delivery and may stall the mix engineer’s progress. In other words, keep the audio-related tasks contained to Pro Tools so we can use a screwdriver instead of a hammer.
Back and Forth
A common question I’m asked with regard to this topic: Should I start my song in Logic or Pro Tools? The answer to that varies. Now that we know our tools, you should select whichever DAW will complement the inspiration for the song. For example, say the idea arrives in the form of an acoustic guitar lick or chord progression. That sounds like a job for Pro Tools, as the takes and ideas can be easily fleshed out, comped and arranged. If the idea is for a drum groove, synth line or piano chord progression, Logic Pro should be the choice. This also applies to experimenting in a blank session with a powerful instrument like Omnisphere.
There was a time when our industry experimented with “OMF” files, which were an attempt to allow different DAW’s to communicate all related information with each other. This proved to be a subpar experience, as information like track names, automation, plug-ins and markers translated in disasteros fashion, often leaving the user with more work instead of less. In modern times, “OMF” may be considered some sort of abbreviated messaging slang. Frankly, that use would be more effective than the actual intended purpose of the file.
Moving back and forth between the DAW’s is not overtly challenging, but it does require diligence and attention. Say we began in Pro Tools with that acoustic guitar idea I mentioned. After the idea is fleshed out and on the grid, it can be bounced or exported into a 24 bit, 48kHz wav file (note: 48kHz is the most common sample rate during production for its increased resolution and manageable file size). Create a session in Logic Pro at 24 bit, 48kHz, import the guitar file(s) and begin drums, percussion or any sort of accompaniment you desire. After the instrumentation has been completed (at least in demo form), export the entire multi-track out of Logic and import the files into the Pro Tools session that contains the acoustic guitar idea.
Ideas that begin in Logic Pro can be nurtured and developed in the same way until just before the vocal recording session. At this point, a stereo bounce of the instrumental from Logic should be imported into Pro Tools. High-level producers then record, comp, tune and bounce an a cappella from the Pro Tools session, import it into Logic, finish the instrumentation/composition, then perform the multi-track export procedure from Logic to Pro Tools for final editing and mixing.
Powerful Mindset
We see plenty of online content that is related to DAW’s (DAW-War memes, rabid disagreements, etc.). In this author’s opinion, that type of mindset is a bit short-sighted and doesn’t adhere to a professional workflow. We should be approaching our use of recording and production software with an objective in mind, then select the appropriate tool (read: DAW) to achieve the task efficiently. It is the path of least resistance, whereas trying to retrofit a task into a DAW that may not be fully equipped to handle said task can be a very frustrating experience.
The mindset of a multi-DAW environment is a gift that technology has only recently bestowed upon us, ushering in the golden age of the DAW. Being open to that mindset and workflow is just as powerful as the DAW’s themselves. Embrace this approach and realize your potential by understanding the tools of the trade. •
DOUG FENSKE is a GRAMMY-nominated, multi-platinum engineer, producer and mixer for artists such as Frank Ocean, LL Cool J and Ryan Tedder. He also serves as Director of Education for Cre•8 Music Academy, which provides four music production courses through a unique partnership with Westlake Recording Studios. For more information about Cre•8 Music Academy, email cre8info@cre8musicacademy.com.