A veteran sound engineer’s hard-won expertise, found in his new book “First 50 Recording Techniques You Shoud Know To Track Music” will help you to nail those high-impact vocal tracks.
Vocal Mic Choice
OVERVIEW: The microphone is the singer’s connection to the audience, whether in person or on recorded media—it’s a very important consideration! The mic that’s used to track a vocalist can make a big difference in the quality of the vocal performance, for some reasons you may or may not guess.
CHALLENGE: When tracking vocals, there are so many important variables. The quality of the mic is important, but we must always keep in mind that a great vocal performance is all about an inspired emotional delivery of a great song. Given the choice between tracking a mediocre performance from a vocalist on a world-class, vintage, classic, to-die-for mic and getting an inspired passionate performance through a mic that costs less than $100, choose the latter every time.
SOLUTION: Here are a few factors to consider when choosing a vocal microphone:
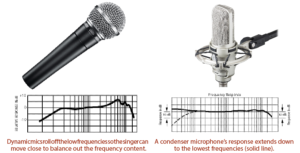
Live performances versus studio recordings: In a live performance application, there is quite a different set of considerations compared to a studio performance. Mics that are designed for live use, such as the Shure SM58 dynamic mic, take advantage of the proximity effect by rolling off the low-frequency band. They almost force the singer to move in close to the mic to get a full sound, helping to dramatically improve isolation. To achieve a full vocal sound, the singer typically needs to be within a couple inches of the mic capsule. Singers with great mic technique take advantage of the proximity effect by moving closer to the mic for the dramatic, sensitive lyrics while backing off for the louder, aggressive passages. On the other hand, mics designed for use in the studio have a low end that extends into the low frequency band, enabling the capture of a full-sounding vocal from 6 to 12 inches or more. When using a more distant technique, the sound of the actual room dramatically impacts the recorded sound.
Therefore, most mics designed for recording vocals provide a high-pass filter, which lets the singer move in closer to the mic without capturing a vocal sound that is overly thick and boomy. In addition to providing better separation from other musicians in the same room, the high-pass filter lets the singer move in closer to the mic for a warm and intimate tone.
Test multiple microphones: Every mic brings a different set of strengths to the vocal session. Just because a mic is a large-diaphragm condenser mic doesn’t dictate that it will sound great on the vocalist that you’re tracking on a given day. Set three or four likely choices in a row and try each of them on the vocalist. Record each mic to a separate DAW track so you can listen closely to the recorded sound. Some people like to set up multiple mics placed very close together in front of the singer, performing this test in one take. I’ve found that the assessment is more reliable when you set them up one at a time through the same channel and processing. This is especially true when using analog hardware.
Condenser microphones: Vocal sounds contain many facets ranging from the transients produced by sibilant sounds to the sound of the air moving over the vocal cords to the way the vocal cords vibrate. There’s a lot of detail in the vocal performance that can be captured most faithfully by a condenser microphone. Either a small- or large-diaphragm microphone is capable of capturing the detail in a vocal sound. However, mics that are considered great vocal mics usually have a large diaphragm because they capture a vocal sound with a bit more warmth and depth relative to a small-diaphragm condenser mic.
Setting the high-pass filter: Many large-diaphragm condenser microphones provide a multi-position high-pass filter. The AKG 414 XLII has a three-position high-pass filter with settings for 40 Hz, 80 Hz, and 160 Hz. Some mics have multi-position filters, each with a different character and function. For example, the Shure KSM 44 has a two-position high-pass filter, but each filter has a different slope. Its 80 Hz cut-off filter has an 18 dB per octave slope, but its 115 Hz roll-off filter has a 6 dB per octave slope. Make sure you read the documentation that comes with each mic to understand the best uses for each function.
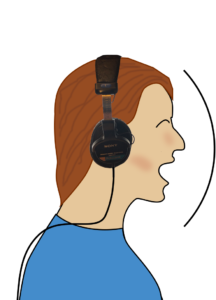
Pop Filters/Windscreens: Condenser mics are very sensitive to blasts of air like the excessive air movement caused by the pronunciation of the plosives in the letters “p” and “b.” These plosives cause a pop, which is the sound of the diaphragm bottoming out—a sound that’s difficult to get rid of. Because of this, it is usually necessary to place an acoustically transparent wind block between the singer and the microphone. Some windscreens are made from a foam rubber material that fits over the top end of the side-address microphone. Another type of windscreen uses a nylon material over a hoop to block the wind made by plosives. Most engineers prefer the nylon hoop pop filters because they tend to be more acoustically transparent than the thick foam filter. Some singers who are experienced in the studio are able to record without the use of a windscreen—they simply aim the plosive off the mic diaphragm. In addition to diffusing the air aimed at the diaphragm, the windscreen also keeps the singer at a controlled distance from the mic.
OVERVIEW: Mic choice makes a big difference in the quality of the vocal sound. In the previous technique about mic choice, we saw that the most important part of the vocal tracking session was the inspired and emotional performance. Mic choice, although very important, was secondary to the quality of the performance. Mic technique, though still secondary to the inspired performance, is something that we should always strive to optimize.
Vocal Mic Technique
CHALLENGE: Granted, world-class vocals are usually recorded using a large-diaphragm condenser mic. However, world-class vocals are usually recorded in rooms that sound great. Tracking vocals in a room that doesn’t add an amazing interest to the vocal sound can be challenging. Recording vocals at home in a bedroom or family room studio can also be challenging. The mic needs to be a good choice, and the acoustical environment probably needs some treatment so that the reflections off the close surfaces don’t permanently diminish the quality of the vocal sound.
SOLUTION: We previously took a look at acoustical control devices. Here’s where they all truly become a requirement if your room isn’t complimentary to the vocal sound:
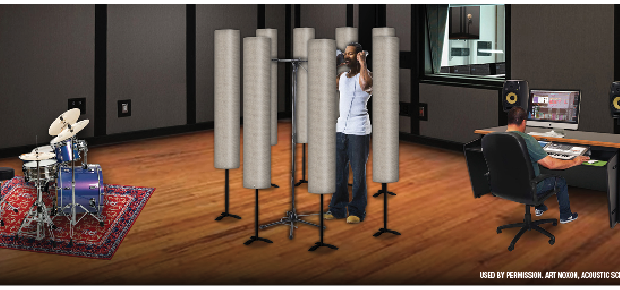
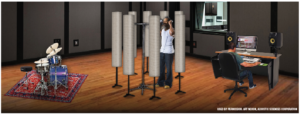
 The importance of acoustic treatment and portable acoustical control tools: Mic technique starts with the room. If the room sounds bad, then the mic will sound bad—I don’t care how much it costs. Buying a set of foam wall panels from Acoustic Sciences or Auralex can do wonders for a room. The tool that I rely on—even in a commercial studio—is the Acoustic Sciences Corporation (ASC) Tube Trap. Surround the vocalist in almost any room with a set of eight of these devices, and your vocal track will be radically improved and probably world-class.
Proximity Effect: Especially when using cardioid and bidirectional microphones, the proximity effect quickly provides an abundance of bass frequencies when the singer moves close to the microphone. However, mics with the omnidirectional pattern are not as subject to the negative influences of the proximity effect. It’s important to be aware of the influences that proximity makes on any microphone. Singing close to a cardioid or bidirectional condenser mic will probably result in too much bass from the vocal unless the mic provides a high-pass filter that reduces just the right amount of low-frequency content. It’s always worth trying an omnidirectional mic if the singer wants to get close to the mic because there won’t be the negative influence of the proximity effect. If you want to track great-sounding vocals, then you must be aware of these variables and how they might affect the vocal sound.
Mic position: Once the acoustics are adequately under control, it’s time to position the mic for the best sound. Usually, the mic can be placed about six inches in front of the vocalist’s mouth. However, if you find that you’re having problems with mouth sound, nose sounds, or if the tone isn’t quite right, then try moving the mic up above the nose facing down or try moving the mic a little lower facing up. Usually, moving the mic up and facing down minimizes a nasal quality, but it all depends on the singer and the actual design of his or her vocal mechanism. Position the mic along an arc in front the vocalist to find the ideal tonal balance.
Gobos, baffles, and screens: Whether vocals are tracked in a small or large room, pay close attention to the intimacy of the sound and make sure it matches the musical power and emotion. Baffles, also called gobos and screens, are usually portable walls about 6–8 inches thick, 4 feet wide and 4–8 feet tall, sometimes with glass or Plexiglas in the upper portion to provide sight lines for the musicians. Baffles help shape the intimacy of the vocal sound, and they also provide isolation from other sounds being recorded in the same room as the vocals. Even though the studio might be large with a wonderful ambient sound, vocals usually need to feel more intimate and roomy, so baffles are an important tool to help achieve the appropriate sound.
Locating the Zone: Finding the perfect singer, microphone, room, and baffling combination might take some time and experimentation, but it’s worth the effort. As the tracking engineer, you’re tasked with knowing the characteristic changes that each alteration might add. Should you have the singer get close to an omnidirectional mic for a close sound without a dramatic proximity effect? Should the singer back off to a distance of a foot or so, using a cardioid condenser mic? Or should you have the singer hold a dynamic mic and use the same kind of mic technique he or she uses in a live performance? Should you use a reflection filter, a portable solution that mounts on the mic stand and absorbs some of the acoustical reflections?  Each of these considerations provide a different musical feel and emotional impact. Time to start practicing!
BILL GIBSON is a veteran producer, engineer and author of First 50 Recording Techniques You Should Know To Track Music. Gibson’s book presents easy-to-understand techniques for recording music in a variety of settings, succinctly presenting a wide variety of subjects, including: preproduction, room environments, interfaces, microphone types and techniques, recording drums, guitar, bass, piano, vocals and electronic instruments, studio recording effects, and more. The Seattle-based Gibson is president of Northwest Music and Recording and is an instructor at Berklee College of Music Online.