First Things First
Many of the most important factors that contribute to a great drum sound happen before I even go and listen to the microphones in the control room. The first thing we need to do is answer some key questions: what type of drum sound are we going for, modern or vintage, and hence, what kind of drum kit? How should the drums be tuned, tighter and more high-pitched or deep in tone? Do we want the drums to ring open with a longer decay or would a “deader,” muted sound be more suitable? And what are the important factors to consider when answering these questions?
First, do your homework. Analyze the sounds and styles you like, including the type of equipment used in these recordings. Remember, there are always less expensive options made of the same or comparable materials. You need to investigate if it’s important to you. Borrowing and renting are options, as well. Whatever it takes! If you have the wrong instruments you will never get the right sounds. Yes, you can add samples later, but you should try to get as close as possible to the sounds you’re after at the recording stage.
Here is an anecdote to illustrate this point. I was fortunate enough to become friendly with drummer Richie Hayward (Little Feat, Eric Clapton). I had just made a Walter Trout record with Richie and he had a modern DW drum kit for the sessions. A little while later, I invited Richie to play on my record, but because I wanted a vintage sound I asked him not to bring his drum kit. Instead, I had a 1960s Ludwig kit set up for him with no hole in the bass drum, two toms and only two crashes. Richie played differently, as a result, and it turned out just like I was hoping it would. If you want, you can listen to my songs “Common Man” and “Evil Men” to hear for yourself.
Let’s take a closer look at some other important factors to consider when recording drums
• Polarity Check
• Drum Tuning
• Drum Treatment
• Mic Configurations
• Drum Processing
Polarity Check
Whenever you record two or more mics at the same time on the same sound source, phase cancellation is a concern. Phase cancellation is the result of two waveforms that are polar opposites, but they don’t need to be 180 degrees apart to cause a problem.
The farther you place a microphone from the sound source the more latent the waveform. As a result, when using both a close mic and a room mic on, say, a guitar amp or several mics at varying distances on a drum kit, you will end up with the sound of the room microphones lagging behind that of the closer microphones.
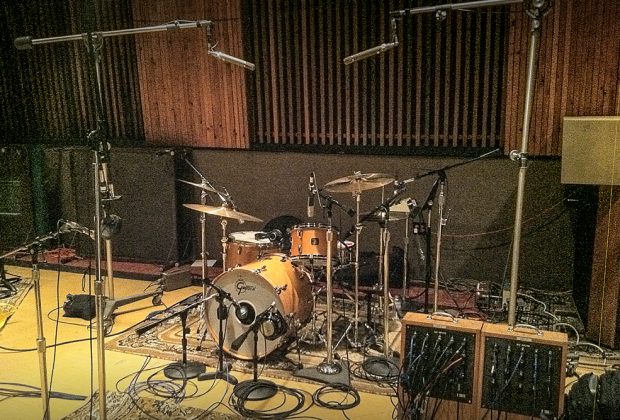
Recording drums can be particularly tricky because there are often 10 or more microphones on a drum kit, and making sure that they are all in phase takes diligence and experience.
 First, if you are using multiple mics on, say, the kick (inside and outside the drum head) or snare (top and bottom), check the polarity/phase on each group. The snare bottom will almost always need to have its polarity flipped. This is due to the fact that the mics are pointing directly at each other, polar opposites. Once this is correct, check the overheads with the kick and snare by flipping and un-flipping the polarity of the overheads, listening for the thicker sound with the more solid center. It’s also a good idea to do the same with the room mics and check their phase against the kick and snare.
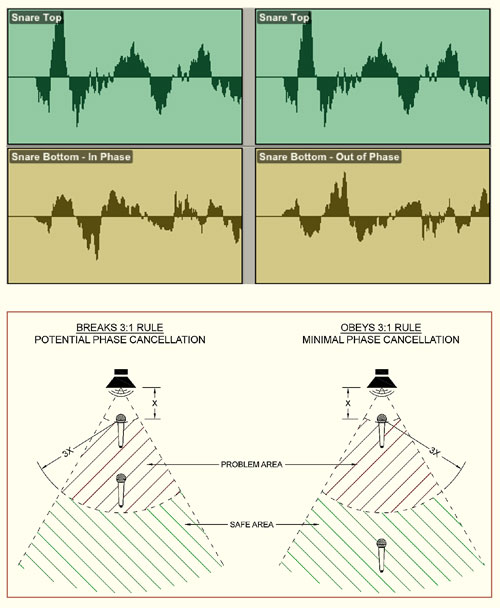
How can you determine if two mics are out of phase? They will sound thin (lacking low end), quiet, and sometimes a little bit swirly. In addition, you can zoom in on the waveforms and visually analyze them. Ideally the two waveforms should be moving in the same direction above or below the zero line at any given location, or at least at the beginning of the waveform.
Let’s go over two principles of microphone placement that will help prevent phase cancellation:
• The Equidistant Rule
• The 3:1 Rule
The equidistant rule states that you place the microphones at exactly the same distance from the sound source. This should provide a nearly perfect phase relationship. One thing to make sure of is that the actual diaphragms/ribbons of the mics are lined up and not just the noses of the mics. For example, on a Shure SM 7 the diaphragm is set back a few inches, and if you aren’t aware of this you may run into phase cancellation.
The second rule is the 3:1 rule, and it requires that you place the second mic at least three times as far away from the first mic as the first mic is from the sound source. So, if the first mic is a foot away then the second should be at least three feet away from the first mic. If you do this you shouldn’t get any problematic cancellation, but sometimes I find that inverting the polarity of the room/overhead mics can still yield a fuller, more coherent result, so it’s always smart to try that.
Speaking of inverting the polarity of a waveform, let’s look at how to check the phase. While you can correct any phase problems after your tracks have been recorded it’s definitely preferable to get it correct at the recording stage because you will make better choices if what you are listening to is in phase.
Most preamps have a switch to invert/flip the polarity. While listening to both mics, flip the polarity of one and listen. If the sound gets thinner and quieter, you don’t have a problem. Un-flip the polarity and proceed as you were. If, on the other hand, the sound becomes thin, quiet and or swirly, you likely are experiencing some phase cancellation. Inverting the polarity likely corrected the problem, and if it sounds good then you can record with the polarity flipped. Alternatively, you could correct your mic placement.
If you are recording and listening in the same room, you may need to record sections with and without the polarity flipped and A/B them as you listen back in order to determine the best setting.
As we noted earlier, while it’s preferable to get the phase relationship correct at the recording stage, it can be corrected afterwards. Most DAWs and many third-party plug-ins have polarity switches. In Pro Tools, you have the Trim plug-in and in Logic, for example, you have the Gain plug-in. In addition, there are both hardware units and software plug-ins that are capable of variable phase, not just 180-degree polarity inversion. Little Labs makes one, for example.
Drum Tuning
Drum tuning is another important part of a good drum sound and a very underrated skill. If you are hiring a drummer or even getting a friend to help out, make sure they know how to tune the drums or have someone come in to do it. There are also plenty of videos to watch to learn how and even some handy drum tuners similar to what you’d use to tune a guitar.
It’ll always be a taste thing and a song-by-song consideration as to how you tune the drums, but one general tip is to make sure the pitch sounds consistent when you tap on the drum next to each lug nut. (Please see the illustration). If not, use a drum key to tighten (raise) or loosen (lower) the pitch, accordingly. 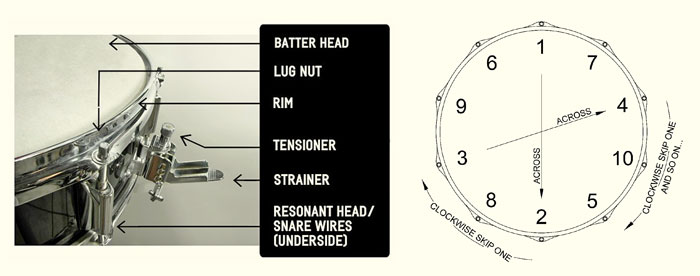
Three important considerations when tuning drums are:
• The overall pitch of the drum
• Getting the drum in tune with itself
(see illustration)
• The amount of resonance/decay
Tuning the resonant heads higher in pitch than the batter heads will generally get you more resonance. With snare drums, you have the additional variable of the snare wire tension—you want to make sure the snare is tight enough for articulation, loose enough that you don’t choke the tone out of the drum, and a decay that complements the tempo and vibe of the song. For example, a spacey ballad usually calls for loose snares, and an up-tempo funk tune with lots of ghost notes usually calls for tighter snares.
Most drums will have a tuning “sweet spot” where they really speak, which is why it’s great to have a few different bass drums and snares having different sizes and shell types to choose from.
Although some professional studio drummers will come to a session with up to 50 snare drums, a little knowledge of tuning and treatment will allow you to get wildly different sounds out of a single drum.
Drum treatment is another critical determination of your drum sound. I’m talking about how live/ringy or dead/muted to make the kit. A couple factors to consider are the tempo and how dense the arrangement will be. If the tempo is slow and the arrangement sparse, I often like to open up the drums and let them ring out a little more to take advantage of the extra space.
In more up-tempo songs with denser arrangements, there just isn’t room for this type of longer decay with the drums. It ends up just muddying the overall sound and diminishing clarity and distinction between sounds/instruments. As a result, I will work with the drummer to dampen/mute the decay of the drums using moon gels, gaffer tape, tea towels, blankets, pillows and/or sandbags. I can also use noise gates to achieve this at the mix stage, but it’s preferable to get it right at the recording stage, as we can’t gate overhead and room mics.
Taping the bottom heads of toms will shorten the decay without drastically changing the overall tone of the drum.For more extreme dampening, treat both the top and bottom heads. Keep in mind double-ply heads will be punchier than single-ply heads.
Removing the front head of a bass drum will give you a very dry and articulate 1970’s style bass drum sound, as will a hard plastic or wood bass drum beater, as opposed to a soft felt beater.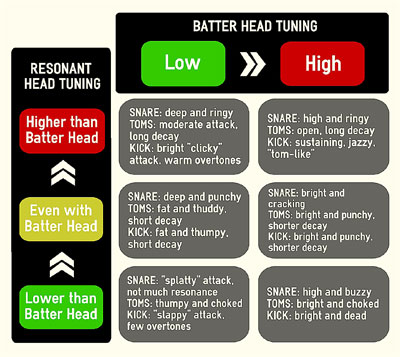
Microphone Configuration
Mic configuration, or where you place the microphones, can also have a significant impact on the overall drum sound. Let’s take a look at some different miking approaches based on the number of mics/channels available.
Most modern recordings include 10 - 15 mics on the kit, resulting in a crisp, punchy, detailed sound. Let’s begin with a look at some useful minimal mic set-ups made famous in the 1960s and still being utilized by some great bands and artists today, like The White Stripes and early Black Keys, for example.
If you only have two mics, I’d suggest using one for the kick (probably a foot or so back) and one as a mono overhead to get the snare, toms and cymbals. For a punchier kick sound, with more attack, place the kick mic inside the drum head.
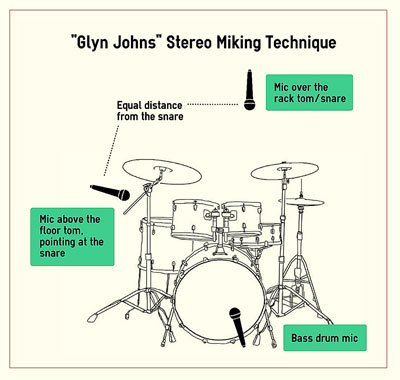
If you have a third mic, you could put it on the snare or use a pair of overheads in combination with a kick mic. Alternatively, you could try what’s known as the “Glyn Johns method” (The Beatles, The Stones, Led Zeppelin, The Who).
It includes one mic on the kick drum as before and one as an overhead in the middle of the kit above the tom and the third mic just outside the floor tom, peeking across the top of it, pointing toward the snare drum. Minimal miking works best when you have a drummer who understands how to dynamically balance the various elements of the kit.
With a fourth mic, I’d either use two stereo overheads or one mono overhead and one mono room mic along with mics on both the kick and snare. This would depend on whether or not I wanted mono or stereo drums.
Depending on how many mics/channels you have, you can keep adding mics to include each individual tom, hi-hats, ride cymbal, snare top/bottom (with the phase flipped), inside/outside kick, mono room, stereo rooms and more.
When miking the kick drum, you place the microphone inside the drumhead for more beater attack and isolation or outside for a warmer more vintage/thuddy sound, with less attack and more natural bleed from the rest of the kit.
Miking the snare, I usually place the mic at a 45-degree angle, pointed at the center of the snare, about 3 - 6 inches above the top of the rim. I’ll point a little more straight down if I want a bit more lows and come across the top more horizontally for less. Another tip for miking the snare is to point the rejection point of the mic toward the hi-hat as much as possible. There is often a lot of hi-hat bleed in the snare mic and this will minimize that.
If you still have too much, you can gate the snare drum at the mixing stage. And remember, most gates have a parameter that allows you to reduce the bleed by a few dbs without necessarily removing all of it. That would be determined by the style of music and how much ambient bleed you want to retain.
Drum Processing
EQ
If I have the right kit and it is tuned and treated properly, I don’t usually use much EQ at the recording stage, but here are a few basics:
Kick: The kick can usually benefit from some extra lows. If you want a deep modern sub to it, try boosting between 30-70 Hz. For more of a vintage thud (a harder sound) try boosting between 100-125 Hz. Another key with the kick is the amount of beater attack. I personally like just enough to hear the attack, but I prefer to feel the bottom end weight of the kick. A “clicky” kick drum with too much beater sound can take focus away from the low end. I find boosting/cutting around 3 - 5 kHz can adjust the amount of attack the kick has. If needed, I’ll do another boost/cut above 10 kHz. In addition, sometimes cutting between 300 - 500 Hz can add a little extra punch by putting a little extra focus on the lows and highs.
Snare: If I want to beef up the snare, I usually try boosting between 100 - 250 Hz. Try cutting between 500 - 1 kHz to reduce “boxy” or “nasal” characteristics. Stick attack can be found between 2 - 4 kHz, boost/cut to taste. Finally, sometimes I’ll boost closer to 10 kHz to further brighten.
 Toms: For punchy toms, try boosting between 50 - 100 Hz with a cut around 300 Hz. If more attack is needed, I usually find it between 3 - 5KHz. For heavier music you may want to high pass filter the toms, but that can certainly be done at the mix stage.
Overheads/Rooms: The style of music and the arrangement will determine how much of the lows I’ll filter out, but it can be anywhere between 50 - 150 Hz. I don’t particularly like to be too heavy-handed here, but if clarity is an issue you can try going further. I also don’t like my cymbals too bright, so I often do not boost the high frequencies above 10KHz, like a lot of engineers do, unless the mix is very dense and requires it. In fact, I often use ribbon mics to record the overheads for this same reason. Sometimes a cut between 200 - 1KHz can increase the clarity.
I don’t always compress the close mics at the recording stage, but tend to do it for more aggressive styles of music. A fast compressor like a DBX or 1176 would be a good option for kick, snare or toms. Usually, I don’t do more than a few dbs of gain reduction.
Try compressing your room mics as a way to create some extra ambiance and excitement. Keep in mind, if you’re in a smaller room, there may be some unpleasant reflections that you may want to minimize by utilizing some sound absorption and diffusion materials.
At the mix stage I will usually add some analog saturation for extra character. Soundtoys’ Decapitator plugin is great for this, as are Universal Audio’s Studer Tape Machine (very versatile) and Slate’s Virtual Tape Machine (simpler and more subtle). In addition, I’ll add parallel compression, which is done by inserting the compressor on an auxiliary channel, allowing you to blend in as much or as little of the compression as you like via a send/bus. This is a great way to add excitement to the drums and pull them forward in the mix.
So, in summary, start out by doing your homework analyzing your favorite recordings to determine what kind of drum sounds you’re after and what type of kit you’ll need to get those sounds. Then, make sure the drums are in phase, tuned and treated in a manner consistent with these goals. You can add further punch, character and excitement to the drums at the mix stage utilizing some of the processing tools and techniques discussed. And, finally, remember that one of the most important factors will of course be the drummers themselves.