
EDITING
Video editing is very much like audio mixing. It appears easy on the surface, but there is a lot of art going on deep inside that makes it a lot more difficult than it seems. That being said, with a little practice there are some basic techniques and tips that can help you get that pro look.
After you’ve determined which footage you need to work with, the next step is to stitch it all together into a story. This is done by using transitions between the clips to join them together. Transitions are so important that everyone from the camera operator to the editor must have a good understanding of how to use them effectively.
Types of Edits
There are three basic types of transitions––cuts, dissolves and advanced effects like wipes and motion transitions. Let’s look at them more closely.
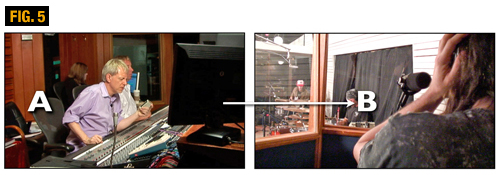
Cuts: The most common transition is the cut, in which when one shot changes instantly to the next (see Figure 5). Most transitions that you see on television and in the movies are cuts.
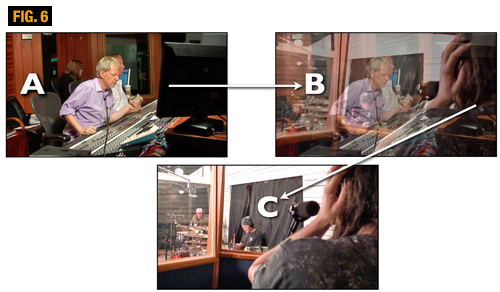
Dissolves: The next most common transition is the dissolve (sometimes known as a crossfade), where one shot gradually fades into the next (see Figure 6).
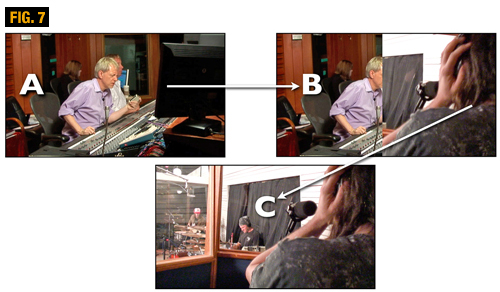
Advanced Transitions: Advanced transitions include wipes and digital effects, where shots whiz by or do complex changes while leading into the next (Figure 7)
A Wipe Transition: Frame A is progressively replaced by B. (Figure 7)
Transitions can be a lot of fun. Be warned, however, that over-using them is a common mistake made by amateur editors. In most professional productions, almost all transitions are simple cuts or dissolves. Too many animated transitions like spirals, newspaper turns, and exploded zooms are distracting and impact the flow of the video.
Although it is important to choose an appropriate type of transition, the real issue is how well the two shots fit together. Ask yourself:
What do you intend to achieve with the transition?
Do the shots fit comfortably together?
Does the transition make sense,
or is it confusing?
Does it further the story?
Transition Tips
Good editors also use a number of neat tricks to make their edits work with the least amount of effort. Try these tips the next time you’re cutting:
• Still to Still––Action to Action: If you’re going to make a cut from a clip that is still, cut to another that is also still. If you’re cutting from one that’s in motion, cut to another that’s in motion. Cutting still to motion or motion to still can be done, but it usually feels abrupt, unless that’s the effect that you’re looking for, of course.
• Cut On The Action: That being said, it always seems to work best when you cut from a clip in motion to another clip in motion because the clips flow so well together that you don’t notice the cut. Even something as simple as a talking head can have motion (hand or arm movement), and using that to cut to another clip of motion will make it seem that much smoother.
As an example, if our artist were entering a club, we could show her outside opening up the door, then the door opening in the club as she walks in. The two scenes could have been shot hours apart but by cutting on the action we don’t notice the cut or any slight continuity errors that might occur in the two shots.
• Continuity: The concept of Continuity is to create the illusion of continuous motion even though you’re taking out the slower parts of the clips you’re working on. In other words, you’re trying to keep the pacing fast, yet seamless. Continuity compresses real-time on the screen yet still carries a progression of the sequence.
Here’s how Continuity works: Imagine the artist entering a club and taking a 30-second walk to the stage. If you showed that entire 30 seconds it would seem like it takes her forever to get there. If you showed 2 seconds of her walking in the door, 2 seconds of her walking through the room shot from behind, 2 seconds of her walking while being shot from the front and 2 seconds of her climbing up on stage, you’ve compressed that 30 seconds down to 8 or less. That still gives you everything you need to know about her entering the club and walking to the stage.
Keeping shots that give the illusion of Continuity will keep the viewer’s attention while he mentally fills in the rest of the walk.
• Parallel Story Lines: This is used to create the illusion that multiple events are happening at the same time and is created by cutting back and forth between two story lines. For instance, you’re watching the artist singing on stage and then it cuts to the artist acting out the lyrical story by walking down a lonely dark street. This type of editing creates greater interest and anticipation by the viewer since they’re interpreting two events at the same time. To make the events seem closer in time, simply shorten each of the shots.