Have you or your band been plagued by audio issues? You’re not alone. Having worked for years in pro audio engineering, sales and integration, Ira White found that people had a lot of the same problems and questions about sound equipment and operation. So he decided to explore those issues in his recent book Audio Made Easy (Hal Leonard Books), providing answers in a very casual and easy-to-understand manner. The following article, based on a chapter from the book, delves into the world of amplifiers—how you can harness and deploy their special power.
NO PAIN, NO GAIN
This is the macho stuff, dealing with devices of sheer brute force . . . heavy current draw . . . massive gain . . . shattered speakers . . . Tim Allen, eat your heart out! Amplifiers take our measly signals from the mixer and boost them enough to move speakers and, hopefully, our sense of good taste. Pro amps can provide power of 200 to 2,000 watts or more. These are the most powerful electronic devices you will use, and they possess the potential for doing the most damage. You want the right amp for your application and enough power for your needs without overloading anything along the way.
So Watt!
How much wattage is enough? Loose answers are based on several factors: “How many vocals/instruments do I have? Am I amplifying bass or drums? What are the capabilities of my speakers? How large an area do I need to cover?” (See, now I’m talking to myself.)
Let me just throw you some rough ideas in this area. The bare minimum I need is about 100 watts per channel stereo for near-field monitors in a small studio. In live sound, one watt per person of room capacity is a reasonable starting point for main speakers, especially in small churches and performance venues. This should cover minimal needs at moderate volume—six to eight channels of vocals and light rhythm instruments (guitar, keyboard, CD playback, kazoo, spoons, etc.). Increase total wattage proportionately to room and audience size. Stage monitors should be fine with as little as 200 watts per channel.
For more powerful club and concert levels, I suggest 2 watts per person minimum (3 watts if subwoofers are employed) should be available, with speakers and subs suited to the task. You can rarely have too much power, so your budget will keep you within a practical range. The good news is that it can cost as little as $100 more to increase your power by 50 percent with current amp technology, so don’t skimp unnecessarily on such a crucial need.
Keep in mind, though, that this decision process needs to be implemented in reverse. We want to design a speaker system that meets the needs of the venue(s) we will perform in, whether installation or touring. Then the speaker system and its specifications will designate the amplification we will need to power it. I would want to have at least 10 percent more power than specified to assure headroom and clean amplification that won’t peak out at nominal levels.
Sound Pressure
Now we need to understand how we hear these wattage differences. SPL, or sound pressure level, represents these differences in decibels (dBs) relative to the way we hear sound. Where only about 10 percent of people can hear a 1dB change in level, around 50 percent of people can hear a 2dB change, and just about anybody can hear a 3dB change. (Most audio knob adjustments are notched in 3dB increments because it assures a noticeable change.)
Now the real kicker—it takes double the amp power to change the level only 3dB, but you need a 10dB increase to double the perceived level!
Consequently, if we have a 100-watt system, we need to get close to 800 watts to sound twice as loud! (Crazy, ain’t it?) But that’s if it depended on the amp alone, which it doesn’t. As with wattage, doubling the number of speakers can also yield a 3dB increase. In that case, getting up to 400 watts with twice as many speakers should add a total of about 9dB. Keep this in mind as you assess your level needs.
CHECKS & BALANCES
Amps take signals coming in and boost them tremendously, including any noise or ground loops. So, it’s the same situation as the mixer input stage—balanced inputs can become crucial. Again, they eliminate noise picked up along the length of the cable and allow you to lift grounds that cause hum. Unless all your equipment is situated close together, you shouldn’t use an amp with unbalanced inputs. Otherwise, Murphy’s Law dictates that you will have problems. Wiring connections are the same as we discussed earlier.
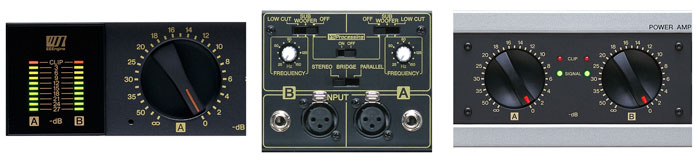
Setting Level
As with mixers, the level controls on the amp should be set properly for the system. When our mixer reaches around 0dB unity gain on its meters (or around –6dB on a digital mixer with full 0dB meters), an amplifier cut all the way up to “0” should be running at full power. Then, when the mixer hits a little above that, we should start to see overload indication on the amp. With this setup, we will always know how hard our system is working by our meter readings. But if we have plenty of power for our system and room, we shouldn’t have to run our amps at max level. It is best to retain optimal mixer levels and simply cut the amps back to a maximum comfortable listening level.
An easy way to check maximum amp levels without breaking glassware is to unhook the speakers from the amp. (Don’t do this with a tube amp!) With strong music or pink noise from an analyzer running through the mixer, bring up the master level until the meter hits +3dB (–3dB on digital mixers). Of course, all processors—like equalizers and crossovers—should be set for unity gain so you don’t lose level along the way.
Then bring up the amp level until you see its overload, or clipping, indicator just start to illuminate. That’s your setting. Now you can cut off the test source, hook up your speakers, and repeat after me: “I will not push my meters over the limit. I know that is all the power I have. I do not want to blow my speakers and spend lots of money on repairs. Thank you, Mr. White for saving my equipment. I’m sending $100 cash to show my appreciation.”
Again, if the system is too loud for your needs with optimal meter levels, drop back the amp levels instead of the mixer to a volume that is comfortable. This will give you a better signal-to-noise ratio through the lines. You can make note of the higher amp settings for future reference in case you need to crank it up for a stronger program. If you can’t quite get the amp to overload with the above procedure, you have my permission to raise graphic EQ or active crossover levels slightly to the point where it does. If it still won’t, it’s an indication you have a level problem or mismatched equipment. Ask a pro for help in finding the best solution.
Ohm, Sweet Ohm
Amplifier power is rated in relation to the amount of power drawn by the speakers. It’s listed in the specifications of the amp and determined by the impedance of the speaker load. You will see dual or stereo amp wattages based on 8Ω(ohms), 4Ω, and sometimes 2Ω loads, and they should correspond to what your speakers can handle if you expect to drive them to full power. (More speakers are damaged by too little power than they are by too much due to the extra stress caused by trying to reproduce a distorted amp signal.) There’s also a rating called bridged mono, which we’ll discuss shortly.
Most speakers are 8 Ω and will indicate it near their connector plate. If you connect two 8Ω speakers to the same amp, the load halves and becomes 4Ω. You’ll notice in amp specs that the wattage on a 4Ω load is often around two-thirds higher than 8Ω. So, for the extra speaker we add, the amp provides more power. By the same token, two 4Ω loads make a 2Ω. However, the limit is usually 4Ω for most amps; below that, they may eventually overheat and shut down. If the total speaker impedance load is too low, you will need more amps to accommodate them. I will even go so far as to give you the only formula I included in my book. (See formula at top of this page.) Obviously, this is too low for a minimum rating of 4Ω. So, use this formula to make sure you’re not overtaxing your amplifiers.
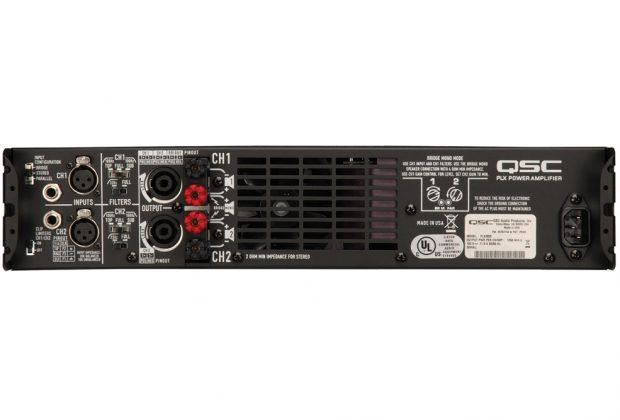
Amp Modes
Most professional amps are designed as stereo, or dual, amplifiers—they will operate in stereo or as two individual amps in one package. Consequently, each amp can handle its own load for discrete purposes, like one side for mains and the other side for subwoofers or stage monitors. Most have a special switch for different modes of operation. These include:
Stereo or Dual—each channel of the amp receives its own source and can function independently of the other side.
Parallel—the inputs of both amps are connected so they receive a common source typically from the first channel (CH 1, CH A, or Left), though each amp’s level setting and impedance load is still independent.
Bridged Mono—both amps are electronically combined to form one BIG amp. This is not meant as a designation for “non-stereo” applications!
This mode is for rare occasions when you have a speaker or subwoofer requiring more power than one channel of an amp can provide. If I wish to drive one 500-watt, 8Ω speaker with an amp of 250 watts per channel at 4Ω, I can switch it to Bridged Mono and turn it into a single 500-watt amp at 8Ω. (And now for my next trick . . .) Only the first channel of the amp provides input and level in this mode. Be advised, however, that most amps are rated only to 8Ω in bridged mode, and there is a special method of hooking up the speakers. I’ll explain that in the Connectors section below, but to make sure you get it right, please refer to your owner’s manual for bridging specifics.
70V Lines
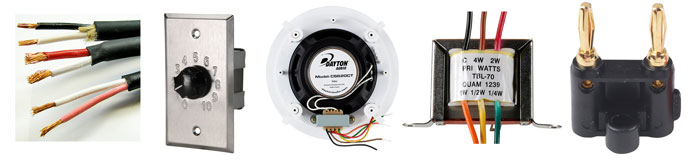
In some installations, you can end up with a mess of little speakers all over the place in ceilings, on walls, under balconies, wherever! This obviously causes a problem with total impedance, so the audio geeks of yesteryear came up with another idea. A 70V connection is designated on amplifiers that accommodate it, and the connection must be used with speakers equipped with 70V transformers. They are designed exclusively for this application.
These speakers have separate wire taps off their transformer for different wattages that we choose for the speaker to draw depending on how much level we need. Since they are usually 8-inch speakers for covering small areas, the taps can range from 1/4 to 10 watts. In this situation, we are concerned with total wattage consumption instead of impedance. With a 50-watt amp, we can run up to 10 speakers wired at 5 watts each: 10 x 5 = 50. Or 25 speakers at 2 watts each. Simple math. For the latter, we can run a speaker line paralleled from the amp to the COM (or C, for common) and 2-watt taps on all 25 speakers.
If you want particular speakers to be louder (maybe because they’re in a noisier area), simply tap those at a higher wattage. Just make sure you tap down at least some of the other speakers to maintain a total load of no more than 50 watts. You can also purchase wallmount 70V attenuators to install in areas where you need variable control of the level. They will include wiring diagrams on how to hook them into the speaker line.
CONNECTORS & CABLES
Amp inputs are generally the same RCA phono, 1/4-inch phone, or XLR connections found on mixers. On amp outputs and speaker inputs, connections include 1/4-inch phone plugs, Neutrik Speakon connectors, or 5-way binding posts. All have specific wiring for positive and negative connections. Speakons are durable, four- to eight-conductor plugs designed to accommodate professional amps and enclosures, including bi-amped, multiwire connections. Binding posts have screw-down caps allowing the connection of bare wire through a hole in the side of their metal posts, or the insertion of dual banana plugs at the head of the caps. Be aware that banana plugs also have positive and negative indication for their posts, usually a tab sticking out on the negative side of the plug. As with all plugs, make sure you get the +/- polarity right for these connections.
For each channel of a dual amp, there will be a red post for the positive (+) side and a black post for the negative (–) side of the connection. In Bridged Mono mode, the red post of the first channel will be the positive, and the red post of the second channel will be the negative. Always double-check your manual for proper connections.
Large-gauge cable is used to carry the higher voltage output of amplifiers. Wires are run side by side like electrical cables and are not shielded like mic and line cables. For different types of speaker cable, there will be some conspicuous difference between the two wires, so you can keep positive and negative straight on each end: copper/silver wires, two-color insulation, ribbed/smooth coating on lamp-cord style, etc. Figuring for a single speaker from a 100- to 400-watt amp, I suggest a minimum of 16-gauge for cables up to 25 feet, 14 gauge up to 50 feet, and 12-gauge up to 100 feet. If in doubt or for larger amps, always go to the next larger gauge.
Going Through a Phase: I can’t tell you how many times I have been to a performance or in a studio and heard speakers wired out of phase. Avoiding this just involves making sure all the positive and negative connections of your speakers are hooked to the same on the amps. Double check yourself. Otherwise, your sound will be screwy.
Your ears can also alert you with a quick test. With music playing, start in front of and facing one speaker, then gradually move toward
the other speaker. When you get equidistant between the two, sound should appear centered. But if it suddenly sounds as if everything is split to both sides, they’re out of phase. It’s most likely the cable connections unless you had Goober rewire your speaker cabinets.
If necessary, you can check to see whether passive (not active) speaker cabinets are internally wired properly. With a cable plugged into the cabinet, quickly touch the positive and negative contacts of a 9V battery to the corresponding points on the other end of the cable. (With a 1/4-inch phone plug, you can touch positive to the tip and negative to the sleeve.) If the woofer jumps forward, everything’s okay. If it jumps backward, connections are reversed. If it jumps sideways, seek counseling.
Proper polarity is important not only for the center imaging, but to avoid loss of overall response. Speakers out of phase are trying to cancel each other out. Once corrected, you’ll notice better response from the whole system, and others will be amazed at your incredible ability to detect the problem. It’s a good way to make new friends and an interesting topic at parties. Pass the chips.
AMP EXTRAS
Amplifiers often incorporate other features that aid our efforts and eliminate the need and cost of extra components. Low-cut switches allow us to roll sub-bass frequencies out of speakers that don’t need it, like stage monitors and ceiling speakers. Variable low-cut and crossover filters in some models will switch amps to full-range or subwoofer modes for speaker systems so you can get by without an external crossover unit. This can be useful with digital mixers, which typically don’t incorporate crossovers but can provide all the other signal processing needed from graphic EQs to limiting and even delayed outputs for underbalcony. Then you can simply run straight from mixer to amps. In the case of powered speakers with their own internal amps and crossovers, you can run straight from mixer to speakers.
 Amp limiters will protect equipment from overload, and some amps may include special speaker processing to optimize speaker response or efficiency. Finally, newer commercial designs are providing computer connection for comprehensive display and network control of an entire system of amplifiers from one central point.
There are also a few multi-amp designs with four to six amplifiers in one package. Though they are typically lower-power versions, they save cost and space for moderate needs, such as monitors or 70V systems. Just be aware of some of these available options when you are shopping for an amplifier. They might save you a few hundred dollars.